
今回はJavascript製のcliツールをTypescript環境のnodeで実行してみたになります。
是非基本的なところを抑えて、めんどくさい作業をScript化していきましょう!

環境
node v16.14.2
commander v9.4.0
インストール
下記コマンドを実行しインストールする
npm install commanderpackage.jsonを開き、インストールされていることを確認する。
{
  "name": "place-of-cli",
  "version": "1.0.0",
  "description": "",
  "main": "index.js",
  "scripts": {
    "test": "echo \"Error: no test specified\" && exit 1"
  },
  "keywords": [],
  "author": "",
  "license": "ISC",
  "dependencies": {
    "commander": "^9.4.0"
  }
}
dependenciesに追加されていればよし。
簡単に動かしてみる
ファイルを作成する。
touch main.tsimport { Commander } from "commander";
const program = new Commander();
program.option("-s, --separator <char>");
program.parse();
const options = program.opts();
console.log(program.args[0].split(options.separator));以下のコマンドを用いて実行する。
ts-node main.ts -s , ab,c
output: [ 'ab', 'c' ]
簡単に実行できましたね。
ちなみにoptionsで記載した内容は -h もしくは –helpオプションでterminal上に出力可能です。
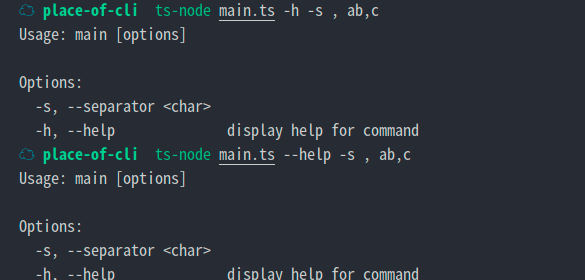
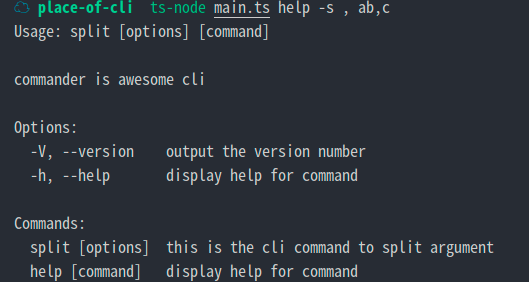
ちなみにhelpで出力する内容は、program.nameやprogram.descriptionを用いてより詳細に記載をすることが可能です。
import { Command } from "commander";

const program = new Command();

program.name("split").description("commander is awesome cli").version("1.0.0");

program
  .command("split")
  .description("this is the cli command to split argument")
  .argument("<string>", "string to split")
  .option("-s, --separator <char>")
  .action((str, options) => {
    console.log(str.split(options.separator));
  });

program.parse();
versionも指定することで-Vや–versionを指定することでversionの閲覧も可能になります。
ts-node main.ts -V
output: 1.0.0
optionsについて
optionを設定することでフラグをつけ様々な値をcliから受け付けることが可能になります。
optionsで設定した値は
const options = program.opts()の形を用いることで取得することが可能です。
必須オプションについて
基本的にオプションを設定しなくてもコマンドの実行は走りますが、必須オプションを指定することで実行前にバリデーションをかけることができます。
program
  ...
  .requiredOption("-s, --separator <char>", "Separate character by arguments")
  ...
  });
☁ place-of-cli ts-node main.ts split abc
error: required option '-s, --separator <char>' not specifiedDefault設定
options()の中の第三引数に値を設定することによってdefault値を設定することが可能です。
program
  .command("split")
  .description("this is the cli command to split argument")
  .argument("<string>", "string to split")
  .option("-s, --separator <char>", "Separate character by arguments", ",")
  .action((str, options) => {
    console.log(str.split(options.separator));
  });
☁ place-of-cli ts-node main.ts split ab,c
[ 'ab', 'c' ]複数の引数を配列で受け取る
ドットを複数繋げることで、次の「–」を受け取るまで値を配列で受け取ることが可能です。
program
  .command("split")
  .description("this is the cli command to split argument")
  .argument("<string>", "string to split")
  .option("-n, --number <number...>", "specify strings")
  .action((str, options) => {
    console.log(options.number);
  });
☁ place-of-cli ts-node main.ts split -n 1 2 3 -- 4
[ '1', '2', '3' ]Commanderについて
かなり序盤から出ていますが、コマンドを定義する際に呼び出されます。
program.command("split")nestして呼び出したりすることも可能です。
program
  .command("split")
  .command("high")
  .description("this is the cli command to split argument")
  .argument("<string>", "string to split")
  .option("-n, --number <number...>", "specify strings")
  .action((str, options) => {
    console.log(options.number);
  });
☁ place-of-cli ts-node main.ts split high -n 1 2 3 -- 4
[ '1', '2', '3' ]hook
hookを使用することでコマンド実行からコマンド終了までの時間を計測できたり、処理の実行順序を整頓し非同期で実行可能になります。
抑えていたいのは以下の3点です。
- preSubCommand・・・コマンド実行前(ちょっと理解怪しい)
- preAction・・・actionコマンド実行前
- postAction・・・actionコマンド終了後
program
  .option("--profile", "show how long command takes")
  .hook("preAction", (thisCommand) => {
    if (thisCommand.opts().profile) {
      console.time(timeLabel);
    }
  })
  .hook("postAction", (thisCommand) => {
    if (thisCommand.opts().profile) {
      console.timeEnd(timeLabel);
    }
  });

program
  .option("--trace", "display trace statements for commands")
  .hook("preAction", (thisCommand, actionCommand) => {
    if (thisCommand.opts().trace) {
      console.log(">>>>");
      console.log(
        `About to call action handler for subcommand: ${actionCommand.name()}`
      );
      console.log("arguments: %O", actionCommand.args);
      console.log("options: %o", actionCommand.opts());
      console.log("<<<<");
    }
  });

program
  .option("--env <filename>", "specify environment file")
  .hook("preSubcommand", (thisCommand, subcommand) => {
    if (thisCommand.opts().env) {
      // One use case for this hook is modifying environment variables before
      // parsing the subcommand, say by reading .env file.
      console.log(`Reading ${thisCommand.opts().env}...`);
      console.log(`About to call subcommand: ${subcommand.name()}`);
    }
  });

program
  .command("start")
  .argument("[script]", "script name", "server.js")
  .option("-d, --delay <seconds>", "how long to delay before starting")
  .addOption(
    new Option("-p, --port <number>", "port number").default(8080).env("PORT")
  )
  .action(async (script, options) => {
    if (options.delay) {
      await new Promise((resolve) =>
        setTimeout(resolve, parseInt(options.delay) * 1000)
      );
    }
    console.log(`Starting ${script} on port ${options.port}`);
  });
例えば上記のように定義されているファイルを実行した場合、
☁  place-of-cli  ts-node hook.ts start --profile --trace start --port 9000 test.js --env=production.env
Reading production.env...
About to call subcommand: start
>>>>
About to call action handler for subcommand: start
arguments: [ 'start', 'test.js' ]
options: { port: '9000' }
<<<<
Starting start on port 9000
command duration: 3.6ms- production.envファイルの読み込み実行(preSubCommand)
- preActionにてコマンド実行計測の開始
- preActionにてtraceの実行 >>> <<<
- action実行
- postActionにてコマンド実行計測結果(command duration)の表示
のような順序になります。
envファイルの読み込みや実行時間を計測するときなどに使用できそうですね。
まとめ
今回はtypescript製の cliツールを簡単に実行し紹介してみました。
作業でめんどくさいことがあれば、cliとしてscriptsを作成して作業効率化していきたいですね!


コメント